GPG Desktop
Introduction to GPG Desktop
GPG Desktop is an attempt to make encryption easier for the average person by providing a simple-to-use frontend for the GNU Privacy Guard (GPG).
Introduction to Public Key Encryption
Public key encryption is based around the concept of key pairs. A key pair is a pair of keys, one public and one secret. The two keys are mathematically linked such that anything encrypted with one can only be decrypted with the other. The public key can be freely distributed, while the secret key must be guarded. In order to send an encrypted message to somebody, you first obtain their public key. The message is then encrypted using their public key, and it can only be decrypted by the recipient, with their corresponding secret key. To allow somebody to send an encrypted message to you, you give them your public key, so they can encrypt the message with it. Then, you can decrypt the message with your secret key.
Public key cryptography enables other scenarios, such as the signing of data to prove its authenticity and the identity of its author. GPG Desktop allows you to easily perform encryption, signing, decryption, and signature verification with public key encryption.
Features / Documentation
home
key management
scratch pad
a wizard
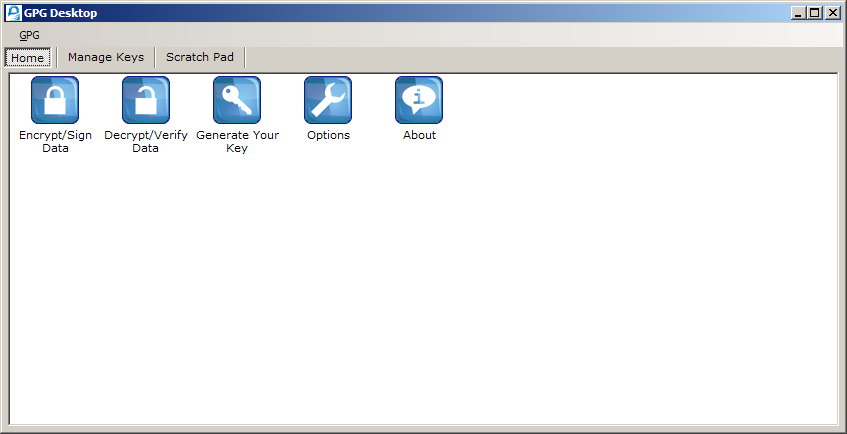
- Home - The Home tab provides easy access to common GPG operations, such as encrypting, signing, decrypting, and verifying data. You can also generate a new key pair from the home tab. The tab can be accessed by pressing F1.
- Encryption/Signing Wizard - The encryption/signing wizard walks you through the process
of encrypting and/or signing data. Encryption protects against eavesdropping, while signing
protects against tampering and corruption. It has the following steps:
- Select the location of the source data to sign or encrypt.
- Select how the data should be signed. There are two types of signatures: embedded and detached. An embedded signature will be attached to the signed data, forming a single document. However, the addition of the signature will alter the document, causing it to be unusable in the application that created it, until the original data is later extracted. A detached signature is stored in a separate file, and does not alter the original document. However, you will need to distribute both files. You can also choose to not sign the data, if you only want to encrypt it. If you choose to sign the data, you must also choose the key that will be used to sign it. If you don't have a key, go back to the home tab and generate one. You will need to know the password of the signing key.
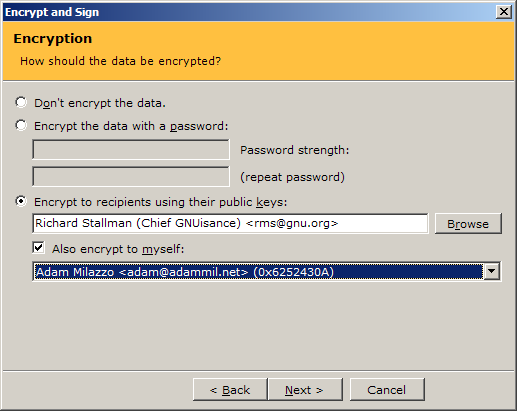
- Select how the data should be encrypted. You can either encrypt the data with a password or with the public keys of the intended recipients. If the data is encrypted with a password, it can be decrypted by anyone who knows (or can guess) the password. If the data is encrypted to recipients' public keys, it can only be decrypted by people who possess the corresponding secret keys (usually just those recipients). You have the option to add yourself as a recipient. This is recommended so that you can decrypt your own data. You also have the option of not encrypting the data, if you only wanted to sign it.
- Select where the signed/encrypted data should be saved. If you selected a single source document, you can save the signed/encrypted data on the clipboard, or in a file. If the source data came from a file, you can choose to overwrite the original file, or to save the encrypted/signed data alongside it in the same directory. If you choose to save as ASCII, the data will be saved in a text format that can be copied and pasted into an email, a chat program, the GPG Desktop scratch pad, or another text-based interface.
- Decryption/Verification Wizard - The decryption/verification wizard walks you through
the process of decrypting and/or verifying the signatures on data. It has the following steps:
- Select the location of the signed or encrypted data. If you are checking a detached signature, this should be the location of the data whose validity is to be checked, not the detached signature itself.
- Select the location of the signatures. If the data is not signed, or has embedded signatures, choose the first option. If the data has a detached signature, you can either select the signature file manually (if there was only one input file), or choose the option to look for the signatures in the same directory as the source files.
- Select where the original data should be saved. If the data was encrypted, this is where the decrypted data will be saved. If the data was not encrypted, but has an embedded signature, this is where the original document (with the signature removed) will be saved. You have a choice of overwriting the source files, or saving the data in the same directory as the source files. If a single input file was chosen, you can also specify the exact output file. Finally, if you just want to verify the signatures, you can choose to not save the original data at all.
- If you know that the data was encrypted with a password, you should enter the password. The system will try that password first during the decryption.
- Key Generation - This form will help you to generate a key pair for yourself.
- Enter the name and email address that you want people to see. This is also the information they may need to enter when searching for your key on a public key server. If you have multiple keys, you can enter a comment to help people distinguish them (for instance "at work" or "at home"). Only the name is actually required.
- Enter a strong password to protect your key. Either choose a short, complex password, or a long, simple password. If your password is short, it must not contain words or syllables from any language, obfuscations of words (like h3ll0), or meaningful numbers, and it should contain uppercase and lowercase letters, numbers, and punctuation, with the numbers and punctuation scattered randomly throughout the letters. If your password is long, it should be a phrase of at least six words, and the phrase should not be a quotation or a saying known by others, and should not be public information. The words should be uncommon, and it's important to include punctuation and oddities in unlikely places. A secret from your childhood works well (e.g., "!I bureeD THe Brokin cup autSide!!").
- If you like, you can customize the key types, but it's usually best to leave them at the default. Be aware that by default, the encryption subkey will expire in five years. (You can create another subkey later using the "Manage Keys" tab.) If you don't want that to happen, check the "No expiration" box.
- Click "Generate" and wait. Key generation can take up to several minutes. If you want to speed up the process, you can move the mouse, start typing a document, or perform disk-intensive operations.
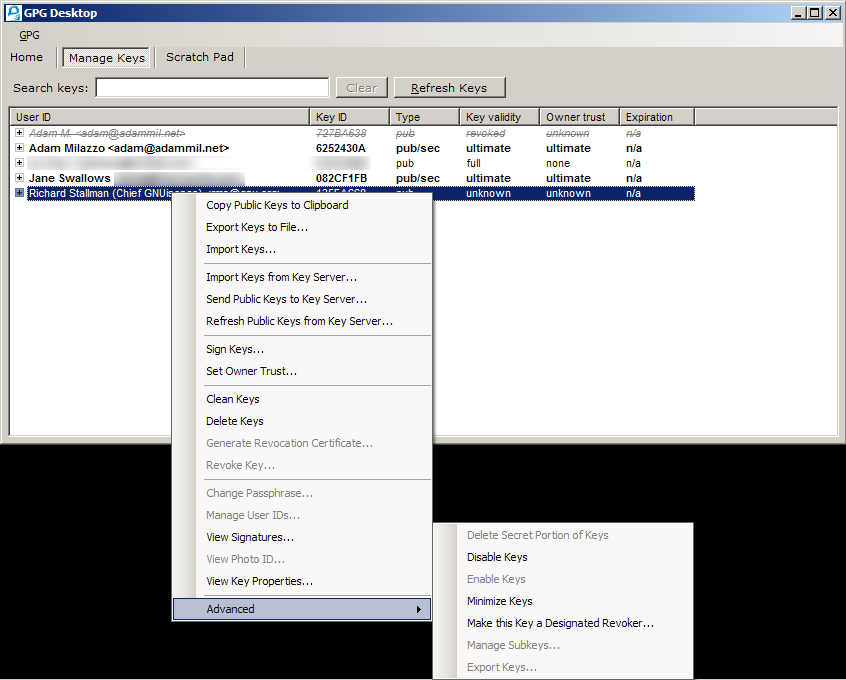
- Key Management - This tab will help you to manage your keys and the keys of others. If you have a lot of keys, you can type into the search box to find the key you're looking for. Right-click on a key to see operations that can be performed on it. You can also select multiple keys to perform an operation on all of them. Double-clicking certain elements will perform shortcuts. For instance, double-clicking a photo ID will display the photo. Double-clicking a subkey or user ID will open the subkey or user ID manager, respectively, if you have the secret portion of that key. Double-clicking any other part of a key will display general key properties. Clicking "Refresh Keys" or pressing F5 will reload the list of keys, in case you've changed them in another program. This tab can be accessed by pressing F2.
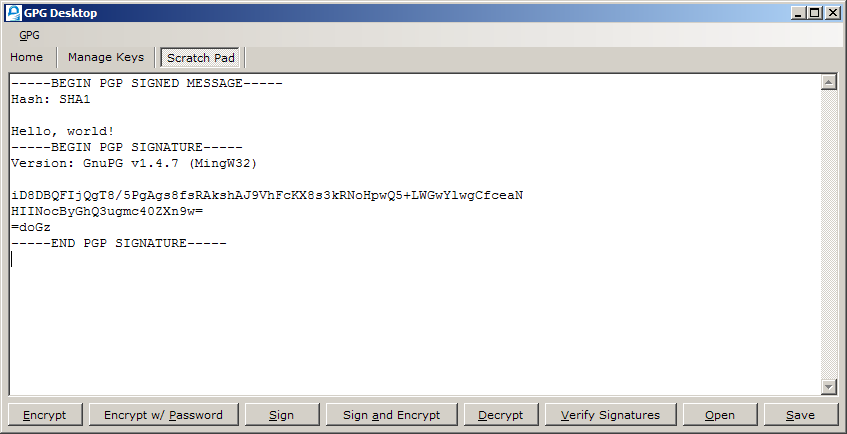
- Scratch Pad - The scratch pad allows you to perform quick operations, such as encrypting or decrypting data, and verifying signatures, on text. The contents of the scratch pad can be loaded from or saved to a file using the "Open" and "Save" buttons. This tab can be accessed by pressing F3.
Download
Executables: GPGDesktop.zip (287kb) Release 4 - released June 20, 2011
Requirements
Before running GPG Desktop, you will need to install these if you don't have them already:- GNU Privacy Guard (GPG) (Older versions containing GPG 1 are preferable to newer versions containing GPG 2. Both will work, but GPG 2 pops up ugly and redundant password input dialogs sometimes.)
- Microsoft .NET Framework 2.0 (You almost certainly have this already.)
Changelog
Release 4 (version 1.07) - released June 20, 2011
- Improved error handling
- Reduced the number of situations in which the GPG process could be orphaned
- Updated password strength estimates
- Fixed the "Make this my primary user ID" checkbox so it actually works now
- Fixed a bug that caused some UI buttons in the user ID and subkey managers to become disabled
- Fixed the add subkey dialog to work better with GPG 2, which changed the underlying API a bit
- Fixed clipboard operations in the password dialog, which could previously cause an error
- Updated default keyservers
Release 3 - released October 8, 2008
- Fixed a bug that caused an exception when pressing backspace in a password dialog in some circumstances
- Made the password required when performing symmetric encryption from the scratch pad
Release 2 - released August 10, 2008
- Fixed a bug that caused an export of all keys in a keyring to fail
- Added the ability to open the manage keys menu with the Apps key, and added mnemonics to the menu items
- Centered the Designated Revoker form within the parent window
- Tweaked the layout of a couple forms
- Made the About box closable by pressing escape
- Improved various help texts
Release 1 - released July 26, 2008
- Initial release
Source code
The source code is available here. GPG Desktop is built on top of my OpenPGP security and UI libraries.