Rotational Force

Introduction
I started writing a vector-based 2d game engine, but as usual, I didn't finish it. It was pretty cool, though. The design was powerful, and the editor I made for it was one of my better programs. I don't feel like writing a lot about it, though, so I'll just dump the text from the editor's original web page here.
Source code
The source code is available here.
Version: 19
Last updated: September 27th, 2010
RotationalForce Editor
Download it here! (836kb)
Prerequisite: .NET Framework 2.0
Changelist
Version 19
- Added a trackbar (slider) editor for some numeric properties.
- Fixed a bug that caused texture rotation and scaling to be too slow.
- Fixed a potential crash that could occur when right-clicking after the last polygon in an object was deleted.
- Added support for dynamic LOD (level of detail), which allows objects to change LOD automatically depending on their size on screen!
- Slight tweaks to the LOD algorithm. It gives slightly more weight to points where the curve reverses itself, so that it's more likely to include those points in the final shape, because I believe that reversal points are more important for capturing the contour of a shape.
Version 18
- Fixed a bug where the GL color would not be reset between creation of texture icons, resulting in discolored texture icons.
- Fixed a bug that caused texture aspect ratio to become squished if a non-square polygon was pasted.
- Fixed a bug that caused selection to be too picky when opening the right-click menu.
- Fixed an annoying quirk with the drag selection code in object mode, where it might unselect the current object if you try to drag it.
- Added the ability to reduce an object to the minimum bounding size of the shape its displaying. Internally, this will distort the shape of the object so that when it's rendered in the non-square object window, the distortion cancels out. However, doing this will warp both the generated texture coordinates and the LOD process because both assume the object is being rendered with a square aspect ratio. Therefore, this is only for optimization, as a "finishing" technique, to reduce the size of the object and speed rendering and collision detection. And it's best used on objects that don't use LOD, such as pre-subdivided shapes. To counteract the texture distortion, the texture aspect ratio can be set to the inverse of the object aspect ratio. Finally, as this distorts both the shape and the object, it's best used on one-off shapes, not shapes that will be shared across object instances.
Version 17
- Added support for freehand polygons. Just right-click and choose "New freehand shape". Note that the resulting shape is not meant to be used directly because it will have too many points. Also, points that cause the polygon to become self-intersecting are not removed. So after creating a freehand shape, fix up any small loops that cause the polygon to self-intersect. Then tweak the LOD until it looks reasonably good. Finally, convert the polygon to a pre-subdivided polygon (from the right-click menu) and tweak the resulting points to get the final shape. Make sure to zoom in and check any sharp corners to ensure that there aren't many points packed into a small space. It may be useful to iterate this process, increasing the LOD value each time.
- Made conversions of polygons to pre-subdivided polygons set the polygon LOD to 0.0 afterwards (that's usually what you want).
- Added a property grid context menu item that will open a better color picker for color properties.
- Broke backwards compatibility again, but nobody had made anything since last time, so it's okay!
Version 16
- Allowed F2 to rename the currently-selected node even if the tree view doesn't have input focus.
- Fixed a "bug" in the polygon splitting code that would cause it to fail with very rare (literally one in a million) polygons due to floating point inaccuracy.
Version 15
- Made shape exporting immediately save the shape to disk, so the level from which the shape was exported does not need to be saved.
- Fixed a crash when converting spline polygons to pre-subdivided vertex polygons.
Version 14
- Made toolbox population somewhat resistant to resource loading failures.
- Added support for multi-layer object templates.
- Made some slight improvements to layer workflow.
- Fixed a potential crash that would occur if the editor form happened to be resized before it was made visible.
- Made vertex cloning take into account vertex order, so it always clones clockwise even if the polygon is counter-clockwise on screen.
- Fixed a sorting issue that caused objects on lower layers to sometimes be selected before objects on higher layers.
Version 13
Upgrade from v12: Create a new project over the old project directory.- Fixed various bugs relating to polygon vertex order being reversed if the object was flipped. Flipping an object will still reverse vertex order, but the editor should now be aware of this fact, so when joining objects of differing vertex orders, for instance, the editor will flip one so the resulting shape has a consistent order.
- Fixed a bug that caused all per-level animation files to be collapsed into a single directory, which can possibly cause collisions.
- Fixed a bug that caused an exception if a resource was renamed.
- Implemented shape exporting. By default all shapes are local to the level. You can export a shape to allow it to be shared between levels. Editing any object that references the shape will automatically update all objects referencing that shape, across all levels. Note that in order for the exported shape to be saved to disk, you must save the level from which it was exported.
- Implemented object template exporting. You can select one or more objects and save them into a template. The template can be dragged in from the toolpane. Updating one of these objects will not automatically update any other object create from the template, however.
Version 12
Note, this release breaks backwards compatibility. Create a new project. Do not load old projects. You can copy images and .map files from old projects, but not any other files.- Rewrote the resource handling system.
- Rewrote the vector shape support, so that shapes are now stored in a hierarchical tree. Added some editor support for managing this hierarchy. See changes to the vector submode, below.
- You can now copy and paste multiple polygons at once, by copying a group that contains them.
Essentially, you can copy and paste any subtree of the shape. Note that copying the root node
of the shape in vector sub-mode not the same as copying the object in object sub-mode.
Copying and pasting the root node of a shape will clone the shape. Editing one shape will not
change the display of the other. Copying and pasting the object will clone the object, and the
result will be another object that references the same shape. Editing one object's shape will
alter the display of both (since they're referencing the same shape).
You should seek to share shapes between objects if possible, primarily so that levels will be more maintable, as you can update all instances of an object at once, but also because it results in less resource usage and greater performance at runtime. The best way to share shapes between objects is to take any shape that's going to be used repeatedly and save it to a file. Then, it will appear in the toolbox, and you can easily drag it into a level to create an object referencing the shape. (Exporting shapes and objects is coming Real Soon.)
- Fixed a bug that would corrupt a shape if you tried to join two objects that referenced the same vector shape.
- Lots of other bug fixes.
- Probably some bugs added, too, since I don't have any regression tests for the editor.
Version 11
- Fixed a nasty bug that caused pasted polygons to deform after they were modified.
- Fixed a crash when adding a new vector shape while a polygon other than the first was selected in a vector shape.
Version 10
- More attempts to make creation of offscreen buffers more robust.
Version 9
- Added a context menu to the property grid that allows you to reset items to their default values.
- Fixed a bug in the object pooling code -- it was referring to UniqueObject:ID instead of UniqueObject.ID
- Added a bit more robust creation of offscreen buffers.
- Added a bit of logging. If an exception occurs, it will be logged. If you quit (except for Alt-F4), and exceptions occurred, you will be asked if you want to save the log.
Version 8
- Fixed a bug that allowed vertices from multiple polygons to be selected in a rare case. That's currently not supported. The result: a crash.
- Fixed a visual artifact that caused the box selection to not redraw the whole box area.
- Made middle-clicking select the object under the mouse as well as toggle submodes.
- Made vertex mode take into account the object's horizontal and vertical flipping.
- Added copy and paste for selected objects and polygons.
- Reimplemented join support. It was deleted in an unfortunate smelting incident.
- Made zooming use the camera zoom function internally rather than changing the scene size. This allowed objects like static images to size themselves properly regardless of zoom level.
- Added the ability to easily select contiguous vertices along a polygon edge -- select a vertex and then ctrl-shift-click another vertex. All the vertices in between, in a clockwise fashion, will be selected as well.
- Added support for loading a tracing image into the background of the scene.
- Made the 'R' key reset the camera view in all modes, instead of just the view editor.
Version 7
- Fixed a nasty bug that caused texture coordinates to be invalidated when certain polygon/vertex properties (eg, vertex color, polygon shade mode) were set.
Version 6
- Made the editor work with OpenGL implementations that don't support 24-bit color buffers. It will now try 32, 24, and 16-bit buffers before giving up.
Version 5
- Included other necessary DLLs, like SDL.dll. I forget that I have those in my path...
Version 4
- Made the border around selected objects use the inverse of the background color rather than always being white. Fixed some other, similar bugs.
Version 3
- Altered the directory layout of editor.zip
- Added a simple tutorial to the bottom of this page.
Version 2
- Fixed a bug where you needed to open a new level (or restart the editor) before the image map you just added could be dragged into the scene as a static object.
Version 1
- Initial release. Lots of bugs, mostly known, some unknown.
Missing from this release
- Polish
- Workflow improvements (eg, smoother layer support)
- Undo
Helpful tips
- The main menus aren't good for anything except opening and closing projects and levels.
- The right-click menus, on the other hand, are much more helpful.
- The object editor has three main editor modes.
- Object editing - the editor mode you'll spend most of your time in. The object editor has multiple sub-modes. Hopefully you'll figure them out as you go! The main two are object mode, which lets you edit the properties of any kind of object, and vector mode, which lets you edit the shape of vector objects.
- Layer editing - lets you toggle the visiblity of layers and whatnot. Unfortunately, you may need to use this more often than you'd like because of the lack of layer-related workflow polish.
- Scene view editing - lets you edit the properties of the scene view, including the background color. You can also zoom from this mode, but since you can zoom with the mouse wheel, it's not so helpful.
- Dragging an image into the editor creates a new static image object. To create a new vector object with a texture, right click somewhere and create a new vector (vertex/spline) shape. Set the "Texture" property in the property editor to the name of an image map.
- Sometimes it may seem that you can't select a polygon in vector-editing mode. This may be because the polygonal outline is self-intersecting (which confuses my selection code). To get around this, select the polygon in the tree view on the right.
- Other selection problems may be caused by layer differences. This is slated for improvement along with the other layer work.
- Object "mounting" and "joining" are two different things. You can mount any two objects, but they remain separate objects. When you "join" objects, you are joining their vector shapes into one vector object. This is how you create vector shapes with multiple polygons, by the way.
- Mounting doesn't appear to work very well, right now. Although it works well internally, the results aren't displayed in the editor. Too bad for now.
- Vertex shapes and spline shapes are the same thing. The only difference is the initial value of the vertices' Split property. You can change a vertex's Split property to change whether or not the spline shape is split at that point, allowing sharp corners. Contiguous vertices with Split equal to true allow you to create purely polygonal shapes.
- You can take a spline shape and convert it into a vertex shape for even more control (and the ability to tweak an object for a lower polygon count). You lose the ability to edit the curve easily, though, so this should only be done if necessary.
- Draw order of vector shapes is determined by the order of the nodes. Nodes are drawn in the same order that they are displayed in the tree view.
Input quick-reference
In all modes (unless overridden by that specific mode)
- Arrow keys - scrolling
- Number keys - selection of current layer
- 'R' key - Reset camera position and zoom
- Ctrl-space - Toggle whether picking works only on the current layer, or all layers up to the current layer (the default).
- Right-drag - scrolling
- Mouse wheel - zooming
- Ctrl-Mouse wheel - selection of current layer
Layer editor
Nothing special.View editor
- Click - Zoom in and recenter
- Ctrl-click - Zoom out and recenter
Object editor - general
- Alt-# - Move selected objects to given layer
- shift-V - Switch to vector submode
- shift-S - Switch to object submode
Object editor - object submode (the default)
- Delete - Delete selected objects
- Click - Select object under cursor
- Shift-click - Toggle selection of object under cursor (use to select multiple)
- Middle-click - Switch to vector submode
- Right-click - Open context menu
- Left-drag on a drag handle - Resize selected objects (use Shift to toggle aspect-locked resizing)
- Left-drag on an object - Move selected objects (use Shift to toggle axis-locked movement)
- Ctrl-drag on an object - Rotate selected objects. You can rotate multiple objects at once and they'll rotate around their common center.
Object editor - vector submode
- Delete - Delete selected node. If the last polygon of an object is deleted, so is the object.
- Ctrl-arrow - Navigates through the tree. Left/right change depth, and up/down move between siblings. (There are more quirks than that, but that's the gist of it.)
- F2 - Rename the selected node.
- Left-click - Select polygon/vertex under mouse cursor.
- Shift-click - Toggle vertex selection. Known issue: you can't select multiple vertices from different polygons in the same object (multi-polygon selection is not supported yet)
- Shift-ctrl-click - Selects contiguous vertices along a polygon edge. Selection is done in a clockwise fashion, from the most recently-selected point to the point shift-ctrl-clicked upon.
- Ctrl-click - Toggles the Split property of the vertex under the cursor
- Middle-click - Switch to object submode
- Right-click - Open vector shape context menu
- Left-drag - Move selected vertices or move vertex/node under cursor
- Right-drag - Clone and drag the vertex under the cursor. Remember that polygons are defined clockwise, so always right-drag clockwise.
- Middle-drag - Move texture of the polygon under the cursor
- Ctrl-middle-drag - Rotate texture of the polygon under the cursor
- Shift-middle-drag - Zoom texture of the polygon under the cursor
- Left-drag (tree view) - Reposition nodes. Dragging a node onto a group adds it to the group. Dragging a node onto any other node moves it before that node.
- Ctrl-left-drag (tree view) - Reposition nodes. Dragging a node onto another node moves it before that node.
- Right-click (tree view) - Open tree view context menu
Object editor - link point submode
- Click - Add link point.
- Right-click - Delete link point.
- Left-drag - Move link point.
- Escape/enter/space - Return to object submode.
Object editor - mount submode
- Click - Select parent object, or select mount point.
- Shift - Snap to nearest link point (when selecting the mount point).
- Escape/enter/space - Return to object submode.
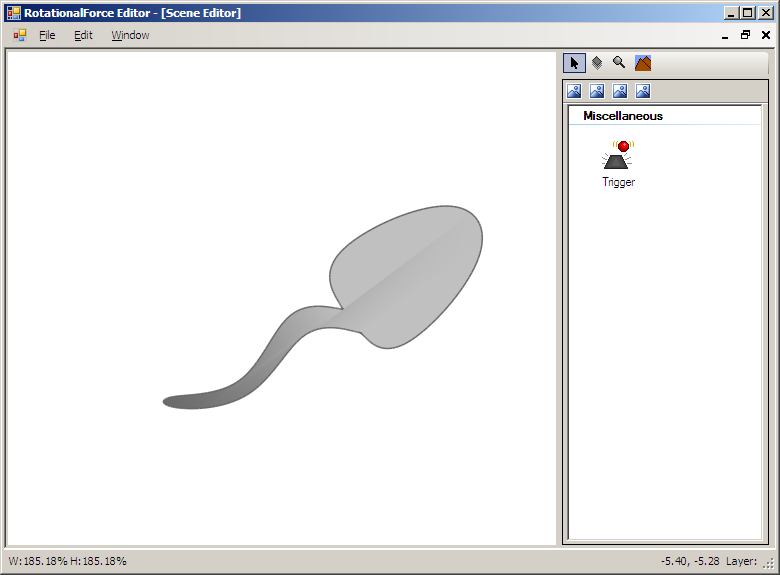
How to make a spermie
Start the editor and open a level. Right click and add a spline shape. Use the mouse wheel to zoom in if it's too small, and right-drag to scroll until it's centered.
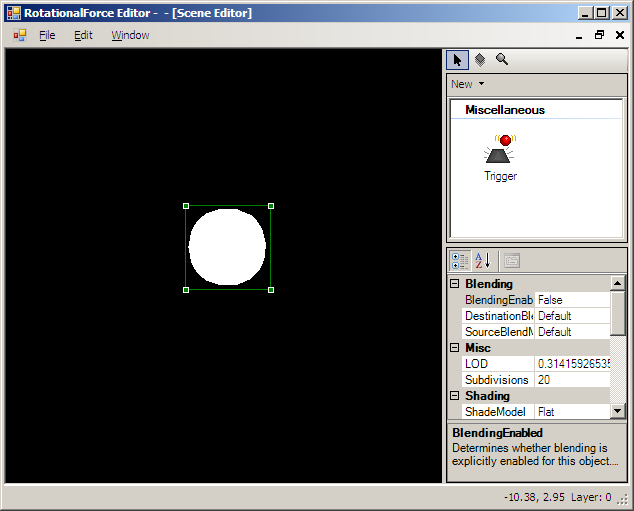
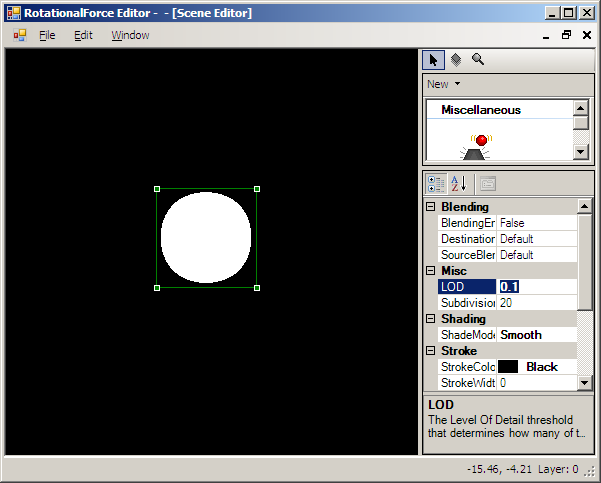
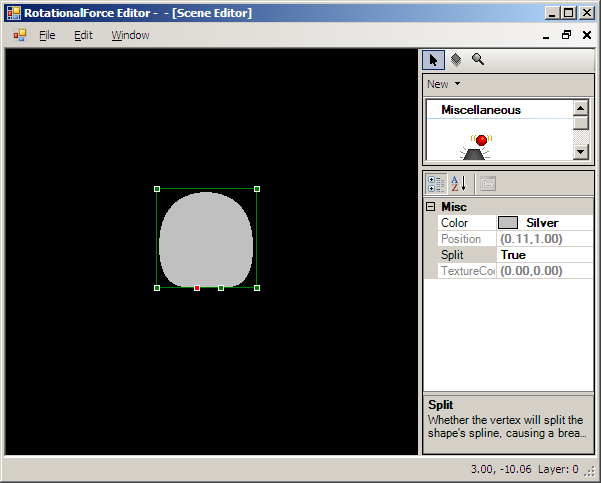
In the property editor on the right, change the LOD to 0.1. This increases the number of points in the shape. 0.1 would normally be too low for an object that needs to be rendered in real time, but for this, it's okay. Press Enter to apply the change. Double-click the ShadeModel property to change it from Flat to Smooth. This way we can smooth-shade the object later.
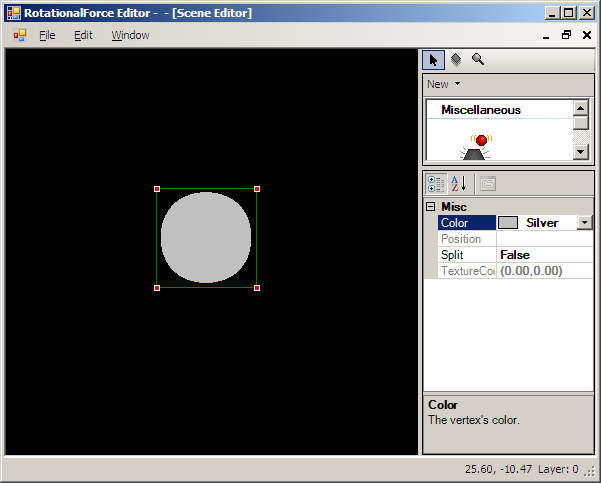
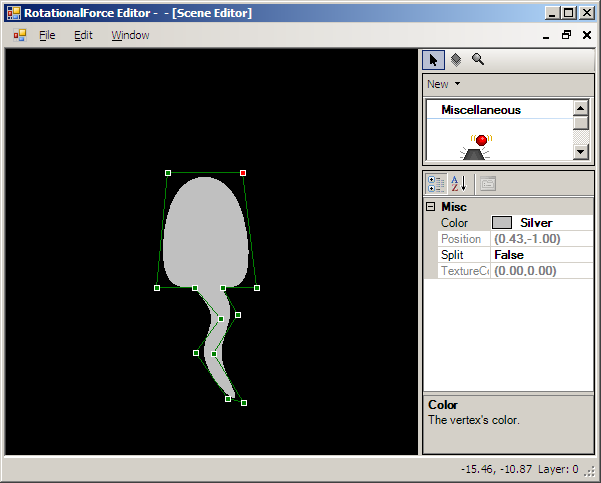
Right-click the circle and choose "Select all vertices". They change from green to red to indicate that they're selected, and the property editor shows the properties of those four vertices. Change their color to "LightGray". You can just type it in and press Enter. (I know it says "Silver" in the screenshot, but later on I decided "LightGray" was better!)
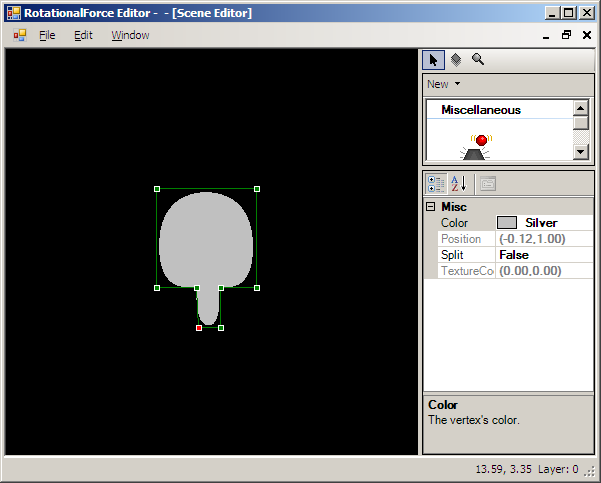
Left-click the center of the circle to deselect the vertices. The property editor changes back to editing the properties of the polygon. Hold down Shift and right-drag the bottom-right vertex to the left until it's positioned about 40% of the way across the square. Double-click the Split property in the property editor to change it to true. This will break the continuity of the spline shape at that point, allowing you to create a sharp corner. Shift-right-drag the new vertex about 20% further to the left so that you have four vertices along the bottom.
Right-drag the third vertex along the bottom edge downward to begin extruding the tail. We must use this vertex instead of the one just created because the vertices must proceed in a clockwise order. Ctrl-click this new vertex to toggle its Split property. (Or, use the property editor.) This way, we allow spline continuity at that point, smoothing the sides of the tail. Clone this new vertex again to get a vertex on each side of the tail.
Right-drag the lower-right vertex of the tail again to create a new segment. Right-drag the new vertex to the left to create the other half of the tail.
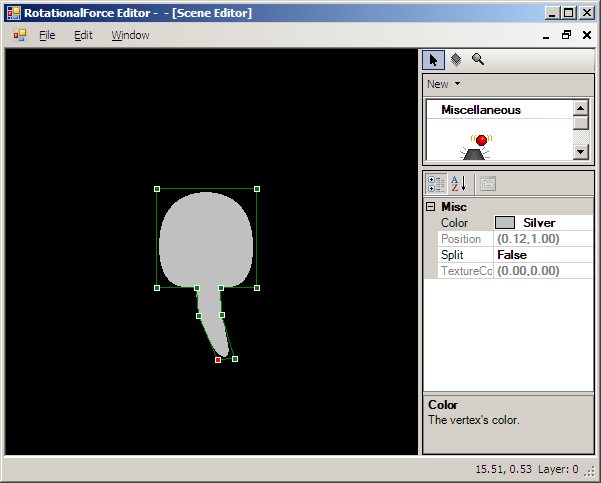
Create another segment as before. Tweak the segments until the tail looks reasonably good. You can select both vertices in a segment (using shift-click) so that you can drag them both together. You might also consider having only one point at the end of the tail, for a pointier appearance.
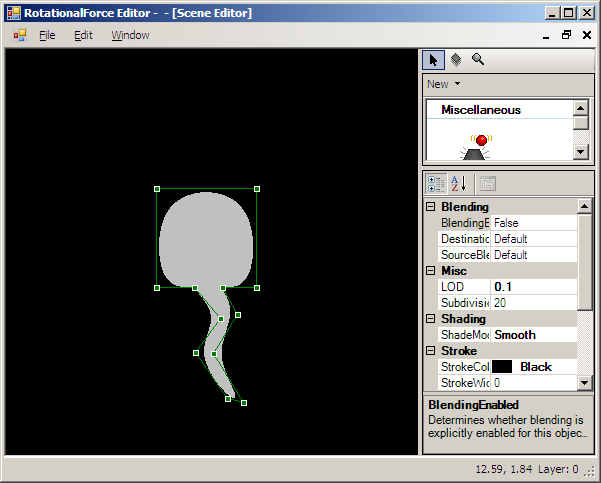
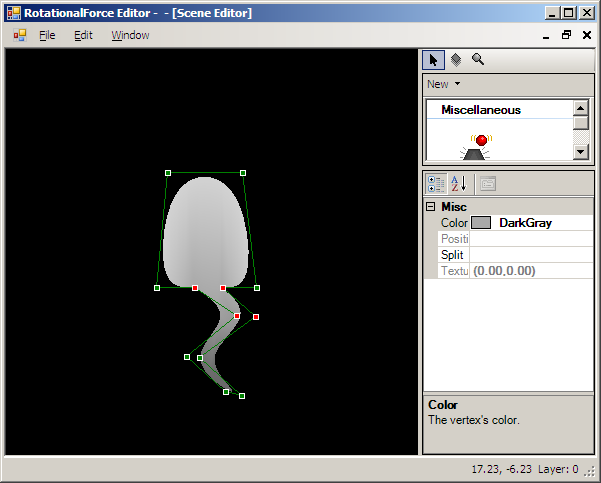
Now it's time to taper the head. Click the top-left vertex to select it. Then shift-click the top-right vertex so that the top two vertices are selected. Shift-drag both vertices upwards to stretch the head vertically. Then, click the top-left vertex, so only the top-left vertex is selected. Shift-drag it to the right a bit. Then select the top-right vertex and shift-drag it to the left a bit, tapering the head.
Now we'll shade the little guy. Select the bottom four vertices (at the end of the tail), and change their color to "DimGray". If you open the color picker with the drop-down, you'll see that "DimGray" is in the group of grey colors along with "LightGray". Change the next four vertices in the tail to "DarkGray" (this includes those at the base of the tail).
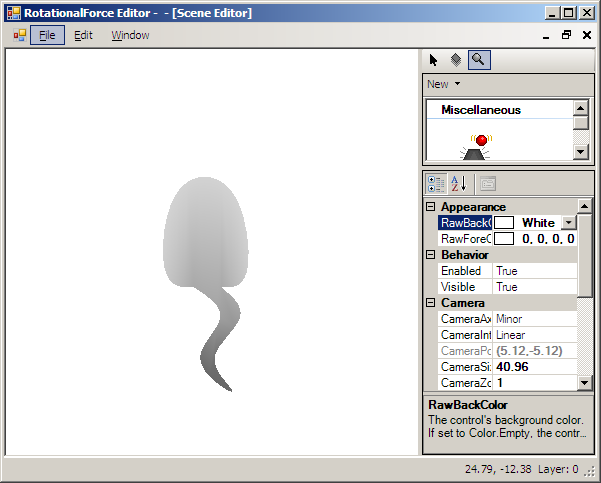
Not bad, but it could be better. It doesn't look so good against this black background, so let's change the background color to white. Select the view tool (the third tool, the one that looks like a magnifying glass), and change the RawBackgroundColor property to "White".
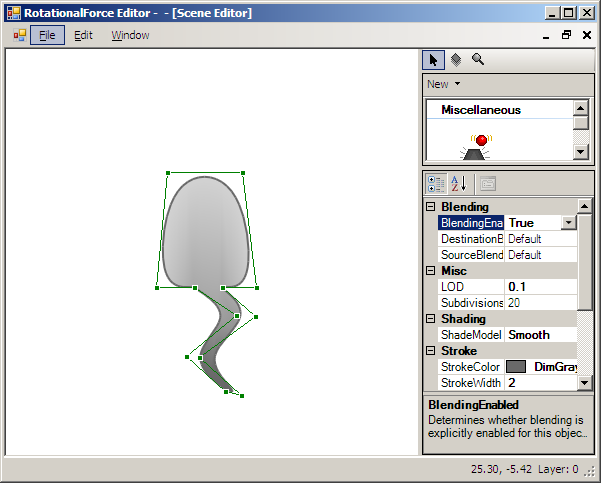
Switch back to the object tool and select the object. You'll notice that you get a series of blue boxes around the object. This is because the object tool defaults to the object submode, which edits the object as a whole. We want to edit the object's shape, so middle-click on the object to switch back into vector mode. Now there's not enough contrast near the top. We can fix that by giving spermie a border. In the polygon properties on the right, set the StrokeColor to "DimGray" and the StrokeWidth to 2. 1.5 also looks nice. Getting better, but the edges are ever-so-slightly jagged. Double-click the BlendingEnabled property to change it to true. This will anti-alias the object border.
Now tweak the spermie to your liking. Try middle-clicking to go into object mode and rotating the object a bit with a control-left-drag. Here's my finished product. (The ugly line is a gouraud shading artifact. These are unfortunate facts of life when using gouraud shading. It could be eliminated by tweaking the geometry a bit, or by using texturing.)